Single sign-on
Staff can sign in through your identity provider instead of the emailed code and link. Manage it under Settings → Single sign-on (requires edit company settings). Microsoft Entra ID, Google Workspace, Okta and any other OpenID Connect provider work today, and SCIM keeps the user list in step with your directory (see Automatic provisioning below). SAML 2.0 is planned.
Jump to: Microsoft Entra ID · Google Workspace · Okta · Any other OpenID Connect provider
How it routes
- A connection owns one or more email domains (
acme.com, acme.co.uk). Within your company a domain belongs to at most one connection, so a merchant-services team on one provider and a sister brand on another can coexist. Another company on the platform may use the same domain with its own connection; nothing is shared between companies. - On the login page, typing an email looks its domain up and offers Continue with (provider) as the primary button.
- Require it (per connection) hides the emailed code and link for those domains. The server refuses the magic link for them too, so it cannot be bypassed by calling the API directly.
- A connection with no domains is shown as a button to everyone, which is useful while you test.
SSO signs people in; it never creates accounts. The email the provider asserts must belong to an active user here. Someone who first signs in this way is linked to that provider identity from then on.
Before you start
You need two things from us and four from the provider.
From MCA Manager (Settings → Single sign-on → Add connection):
- The redirect URI. It has the shape
https://your-host/api/auth/sso/ID/callbackand the exact value appears on the connection as soon as it is saved. Save the connection first with a placeholder secret if the provider insists on the URI up front, then edit it. - Your email domain(s).
From the provider: the issuer URL, the client ID, the client secret, and the list of people allowed to use the app. Each walkthrough below tells you exactly where each one is.
Every walkthrough was checked against the provider's own documentation in September 2026 and uses the labels the consoles show today. Menus do get renamed; when a label below is not on your screen, the deep links go to the exact page, and the provider article linked at the end of each section is the authoritative source.
Microsoft Entra ID
You need a role of at least Application Developer in your directory; a Global Administrator has it. Microsoft's own guide: Register an application.
1. Register the app
- Open the Microsoft Entra admin center: entra.microsoft.com. If you have several directories, use the Settings gear at the top to switch to the one your staff sign in to.
- In the left menu choose Entra ID → App registrations, then New registration. Direct link: App registrations. (Older layouts show the same page under Identity → Applications → App registrations.)
- Name:
MCA Manager(your staff may see this name; anything works). - Supported account types: Single tenant only – (your directory). Do not pick a multi-tenant option; the connection is meant for your directory alone.
- Under Redirect URI (optional) choose the platform Web and paste the redirect URI from MCA Manager. (You can also add it later, step 2 below.)
- Select Register.
2. Copy the two IDs
On the app's Overview page, copy:
- Application (client) ID → this is the Client ID in MCA Manager.
- Directory (tenant) ID → the Issuer URL in MCA Manager is
https://login.microsoftonline.com/+ that ID +/v2.0. Use the ID, nevercommonororganizations.
If you skipped the redirect URI at registration: under Manage select Authentication, open the Redirect URI configuration tab, select Add Redirect URI, choose the Web tile, paste the URI and select Configure. Microsoft's article: Add a redirect URI.
3. Create the client secret
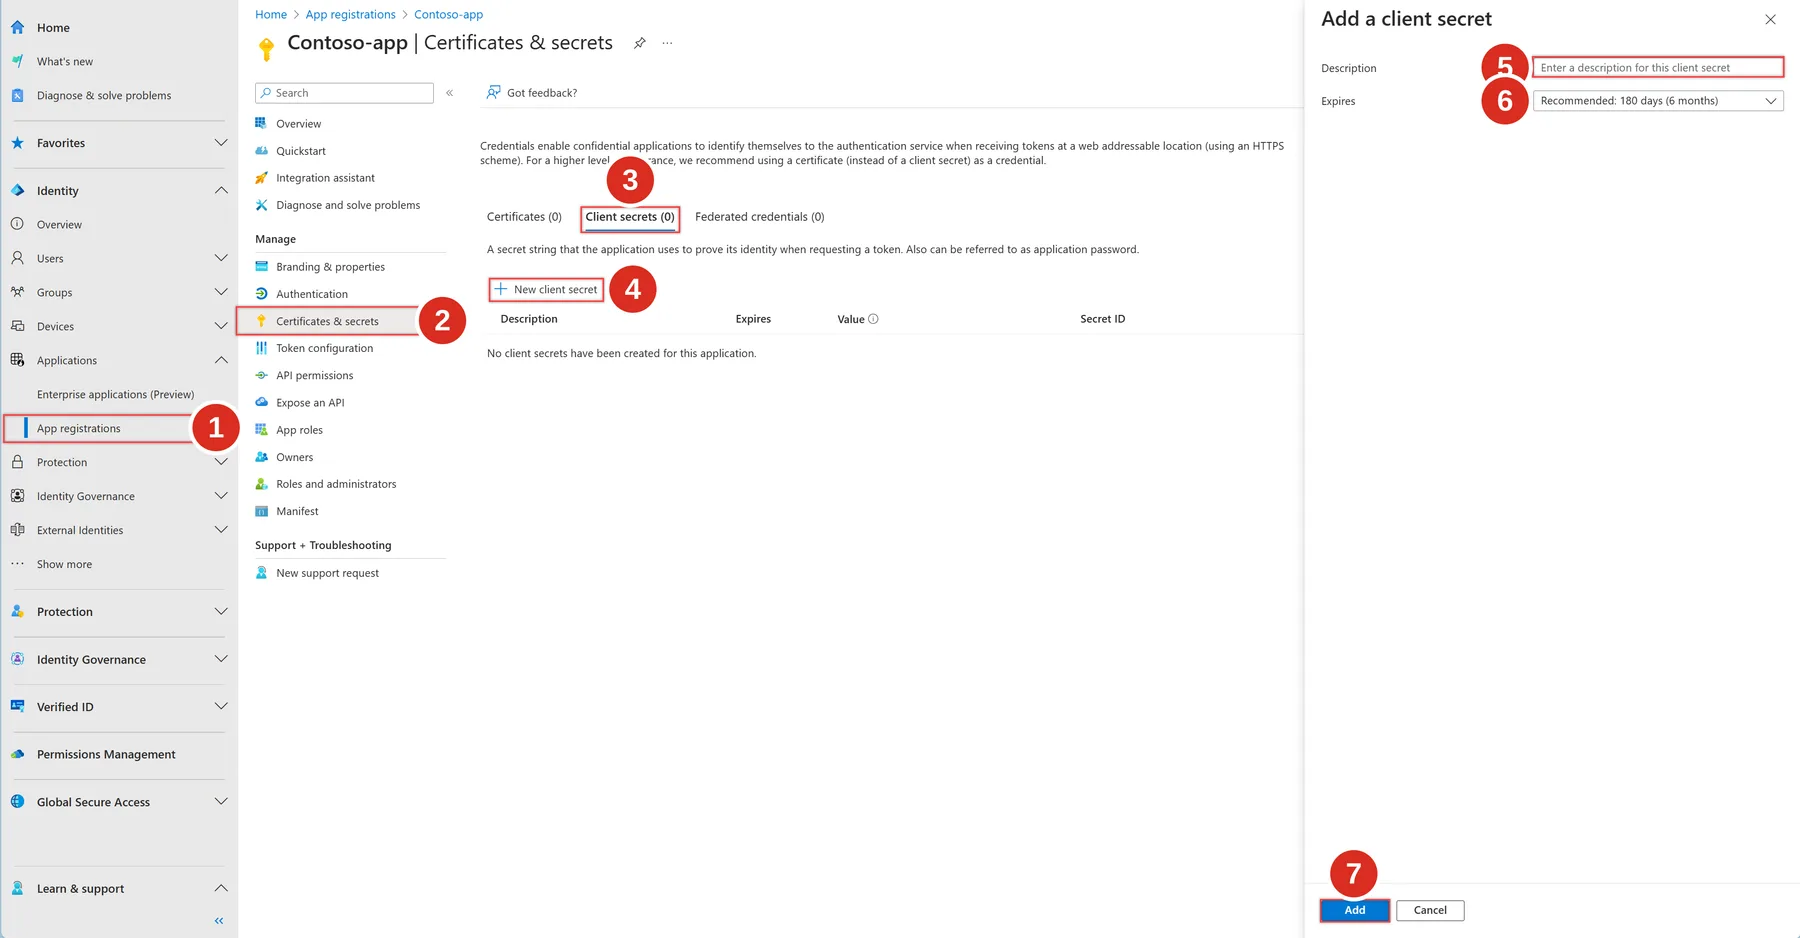
Screenshot from Microsoft Learn, Add and manage app credentials (Microsoft Corporation, reused under the documentation licence). Numbers added by us. Tap the image to open it full size. In newer layouts the left menu reads Entra ID → App registrations.
- In App registrations, open your app.
- Under Manage select Certificates & secrets.
- Open the Client secrets tab.
- Select New client secret.
- Description:
MCA Manager. - Expires: pick a period. Microsoft allows at most 24 months and recommends less than 12; put the expiry in your calendar, because sign-in stops the day it lapses. To renew, create a new secret here and paste it into the connection in MCA Manager (the old one can then be deleted).
- Select Add.
- Copy the secret's Value column now, not the Secret ID. The value is shown only while you stay on this page.
Microsoft's article: Add credentials.
4. Choose who can sign in (recommended)
By default every user in the directory can use the app. To limit it:
- Go to Entra ID → Enterprise apps and open the app (it appears there automatically). Direct link: Enterprise applications.
- Properties → Assignment required? → Yes → Save.
- Users and groups → Add user/group → pick the staff group.
People also need an active user record in MCA Manager with the same email; assignment in Entra alone does not create one.
5. Finish in MCA Manager
Settings → Single sign-on → Add connection → Microsoft Entra ID:
| Field | Value |
|---|---|
| Shown on the login page as | e.g. Microsoft or your company name |
| Issuer URL | https:/ |
| Client ID | Application (client) ID |
| Client secret | the secret Value |
| Email domains | your staff domains, e.g. acme.com |
Save, run Check (it fetches Microsoft's discovery document for that directory), then sign in from a private window before ticking Require it.
Microsoft does not mark emails as verified in the way other providers do. MCA Manager therefore trusts the address a single-directory issuer asserts, and still requires the domain to be on the connection. If your directory has the optional claim xms_edov available under Token configuration → Add optional claim → ID, adding it is a good extra check.
Google Workspace
You need a Google Cloud project owned by your Workspace organisation and the Owner or Editor role on it. Google's own guides: Configure the OAuth consent screen and Setting up OAuth 2.0.
1. Pick the project
- Open the Google Cloud console and sign in with a Workspace admin account.
- In the project picker at the top, select a project or New project
(name it
MCA Manager). Make sure the project belongs to your organisation, not to No organization; only then can the app be marked internal.
2. Branding and audience
- Open Google Auth platform → Branding: console.cloud.google.com/auth/branding. The first time, select Get started.
- App information: App name
MCA Manager, User support email your IT address. - Audience: Internal. This restricts sign-in to accounts in your Workspace organisation and skips Google's app verification.
- Contact information: an email for notices from Google. Agree to the policy and select Create.
If the app already existed as External, open Google Auth platform → Audience (direct link) and switch it to Internal.
3. Create the OAuth client
- Open Google Auth platform → Clients: console.cloud.google.com/auth/clients.
- Select Create client.
- Application type: Web application.
- Name:
MCA Manager. - Under Authorized redirect URIs select Add URI and paste the redirect URI from MCA Manager. Leave Authorized JavaScript origins empty.
- Select Create.
- The dialog shows the Client ID and Client secret. Copy both now (or Download JSON). Google shows the secret only at creation; afterwards the console displays its last four characters.
Nothing is needed under Data Access: the sign-in uses only the openid,
email and profile scopes, which are not sensitive.
4. Finish in MCA Manager
Settings → Single sign-on → Add connection → Google Workspace:
| Field | Value |
|---|---|
| Shown on the login page as | e.g. Google |
| Issuer URL | https://accounts.google.com (pre-filled) |
| Client ID | ends in .apps.googleusercontent.com |
| Client secret | from the dialog, starts with GOCSPX- |
| Email domains | your Workspace domain(s) |
Google does not restrict which Google accounts may attempt a sign-in beyond the Internal audience; the email-domain list on the connection is what stops a personal Gmail account. Add every domain your staff use, then Save, run Check, test from a private window and finally tick Require it.
Okta
You need Super Administrator or Application Administrator in Okta. Okta's own guide: Create OIDC app integrations.
1. Create the app integration
- Open your Admin Console (
https://your-org-admin.okta.com). - Go to Applications → Applications and select Create App Integration.
- Sign-in method: OIDC – OpenID Connect. Application type: Web Application. Select Next.
- App integration name:
MCA Manager. - Grant type: leave Authorization Code ticked.
- Sign-in redirect URIs: replace the default with the redirect URI from MCA Manager.
- Sign-out redirect URIs:
https://your-host/login(optional). - Controlled access: Limit access to selected groups and pick the staff group, or Allow everyone in your organization to access.
- Select Save.
2. Copy the credentials
On the app's General tab, under Client Credentials:
- Client ID.
- Client secret (select the eye icon or Copy). Client authentication must be Client secret, which is the default for a Web Application.
3. Find the issuer
- Simplest: your org URL,
https://your-org.okta.com(the Org Authorization Server). Any Okta org has it. - Alternatively Security → API → Authorization Servers lists custom
servers with their Issuer URI, for example
https://your-org.okta.com/oauth2/default. Use that if your Okta plan includes API Access Management and you prefer a custom server. Either way, the issuer must serve/.well-known/openid-configuration, which Check confirms.
4. Assign people
Assignments tab → Assign → Assign to People or Assign to Groups. Unassigned users get Okta's "not assigned" error when they try.
5. Finish in MCA Manager
Settings → Single sign-on → Add connection → Okta:
| Field | Value |
|---|---|
| Shown on the login page as | e.g. Okta |
| Issuer URL | https://your-org.okta.com or the custom server's Issuer URI |
| Client ID | from General → Client Credentials |
| Client secret | from General → Client Credentials |
| Email domains | your staff domains |
Save, run Check, test from a private window, then tick Require it.
Any other OpenID Connect provider
Auth0, Duo, JumpCloud, OneLogin, Keycloak, Ping and most others work with the Generic OpenID Connect preset. The provider must:
- offer an issuer URL that serves
/.well-known/openid-configuration(Check verifies this); - support the authorization code flow with a client secret and the
scopes
openid email profile; - include the user's email in the ID token, ideally with
email_verified: true. Without that claim, first-time users cannot be linked automatically; ask us and we can pre-link identities.
Create a "regular web application" (the provider's wording varies), paste the redirect URI, copy the client ID and secret, and finish in MCA Manager as above.
Test, then require
- Check on the connection runs OpenID discovery against the issuer and records the result on the row.
- Open a private window, go to your login page, type an email on the connection's domain and use Continue with (provider). Fix any provider-side error before continuing (the messages name the missing piece: an unassigned user, a redirect URI that does not match exactly, a wrong issuer).
- Tick Require it only once a second admin has signed in successfully.
Locked out?
Turn the connection off (or delete it) and the emailed code and link return for its domains immediately. An admin on a different domain, or one whose connection is not required, can always get in that way; keep at least one such admin while you roll SSO out.
Audit
Creating, editing, enabling, disabling and deleting a connection is written to the audit log with the domains and the enforce flag; secret rotations are recorded without the secret.
Automatic provisioning (SCIM)
With single sign-on in place, the identity provider can also create, update and deactivate staff accounts here, so joiners and leavers are handled where the directory is. This is SCIM 2.0; it needs a token from this app and two values on the provider's side.
- Settings → Single sign-on, on the connection's row click Set up
SCIM. Copy the token (shown once) and the base URL
https://<your host>/api/scim/v2. - In the provider, turn on automatic provisioning for the app you created
above and paste both values:
- Microsoft Entra ID: Enterprise applications → your app → Provisioning → Automatic; Tenant URL = the base URL, Secret token = the token; Test connection, save, then assign users or groups and start provisioning. Entra syncs every 40 minutes; Provision on demand pushes one person now.
- Okta: the app → Provisioning → Configure API integration →
Enable; SCIM connector base URL = the base URL, Unique identifier
field =
userName, authentication = HTTP Header with the token; Test connector configuration, then under To App enable Create users, Update user attributes and Deactivate users. - Google Workspace: Apps → Web and mobile apps → your app → Auto-provisioning; endpoint = the base URL, token = the token.
- New people arrive as operators (or admins, if you chose that when issuing the token) with that role's default permission profile; adjust under Users as usual. Someone the provider deactivates is signed out everywhere at once and cannot sign in again until reactivated. Accounts are never deleted from here by the provider.
| Provider attribute | Here |
|---|---|
userName (or the primary email) | Email; must be on one of the connection's domains |
name.givenName + name.familyName (else displayName) | Name |
active | Active / deactivated |
externalId | The provider's id, stored for matching |
Only staff accounts (admins and operators) are visible to the provider;
portal accounts for ISOs, syndicators and merchants are never touched.
Rotate token invalidates the old token the moment the new one is issued;
Revoke stops provisioning without touching single sign-on itself. Every
change the provider makes is in the audit log with the source scim.
Can’t find what you need? Return to the app or contact your administrator.